Protogen electronics version
There are two different versions of my protogen electronics, let's call them V1 and V2. There are some differences in the guides depending on which version you have. Everything done before summer 2024 is V1 and everting after that is V2. V2 can also be recognized by its two piece PCB. There can also be some software differences even inside the different versions
Powering your toaster
Connect a USB PD power source to your protogen with an USB-C to USB-C cable. To correctly function your protogen needs at least 8V input voltage. 20V is the maximum input voltage. By default your protogen is configured to take 15V from any USB PD power source. It is reccomended to buy a battery bank with at least 35W USB PD output. Average power consumption for my protogens is ~12-15W.
V1: Your protogen has limited functionality if powered with 5V (standard USB). This is not reccomended and I can not guarantee long livity if powered like this. If the LED next to the protogen power input USB-C port is red that means that the input voltage is too low. Remember that USB cables other than USB-C to USB-C cables do not support USB PD so they should not be used.
V2: Your protogen will not start if the voltage is less than 8V. Blue LED will blink on the PCB to indicate low voltage
Using handpaws
The hand paws are turned on using a switch located nect to a USB connector. Move switch to right to turn on the hand paws. White LED blinks thrice when the paws are turned on
Handpaws have four buttons. A command is sent every time a button is pressed or released. When button is pressed a green LED will blink and red LED will blink a button is released
Handpaws go to sleep to save power if any buttons aren't pressed in the last 2s (10s for V1). Going to sleep is indicated by blinking blue LED once. Battery percentage is transmitted when handpaws go to sleep. Handpaws wake up when any of the buttons is pressed.
Handpaws can be charged using any USB charger. Red LED means that the paws are charging. Green or orange LED indicates full battery. Charging the handpaws is not recommended when the battery is not connected.
V2: HUD
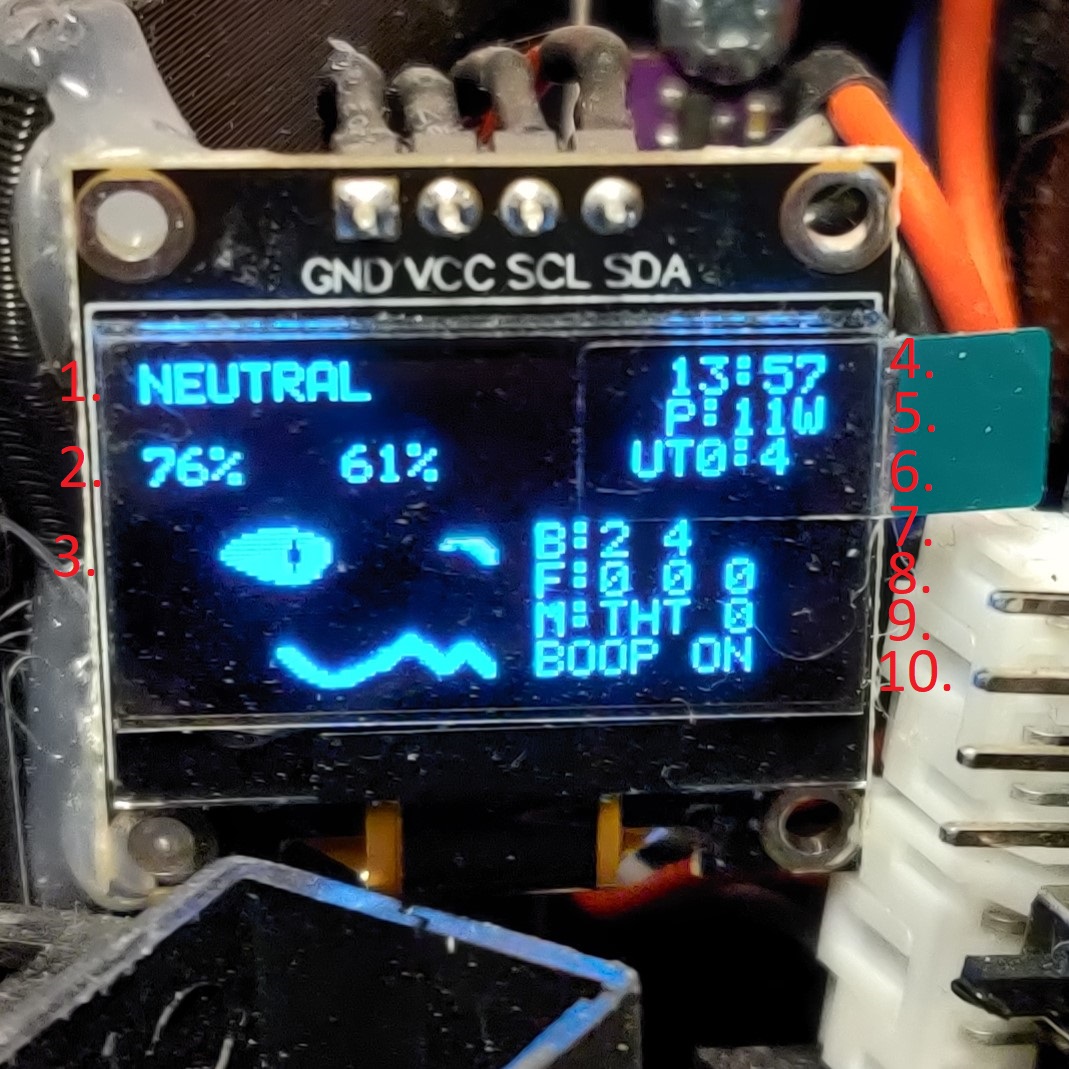
- Name of the current expression
- Paw controller battery percentages
- Live view of the current expression
- Time
- Power consumption
- Uptime (How long has the suit been on)
- Brightness. Panel brightness 1-4, Circle brightness 0-9
- Fans speeds 0-5
- Active microphone and sensitivity
- Boop detection on/off
Changing expressions
Expressions can be changed from the handpaw buttons. Buttons 1-7 are used to change the expressions and each button corresponds to a single expression.
The expressions are divided into sets and each set can have up to seven expressions. Each of the 1-7 buttons correspond to a single expression in the set. Button 8 is used to change the active set. Pressing button 8 once will show the names of the expressions in the set. Pressing the button 8 again will change the expressions set.
Changing settings
V1: Settings menu can be opened by holding down the button 8 for 1.5s. Then settings can be changed like expressions
V2: Settings menu can be opened by holding down the button 1 or 5 for 1.5s. The settings are displayed as a list and a cursor is used to select which setting you want to edit.
- Button 1 or 5 moves the cursor up
- Button 2 or 6 increases the value of the setting
- Button 3 or 7 decreases the value of the setting
- Button 4 or 8 moves the cursor down
V2: Playing music
Music player can be opened by holding down the button 4 or 8 for 2s. The music player is navigated in the same way as expressions are. The seleted file will play even if the music player is closed. Music can be stopped by selecting the same file twice or by selecting a new file to play.
You can add your own music files to the SD card in to the /Music file. Here are the requirements for the music files:
- Keep the name short. 10 characters max
- File type: WAV
- Bit resolution: 16 bits
- Audio frequency: 24000Hz
- Audio channels: Mono
V2: Display dev info
Developer information can be dispalyed by holding down button 3 or 7 for 2s.
Internal microphones, throat microphone and sensitivity
There are three micropohes in the protogen head. Two internal microphones and a throat microphone. Internal microphone near users mouth is used to move the protogens mouth when the user speaks. Second internal micophone is near the protogens right ear. It is mounted there so that it is far away from any fan noise. This ear microphone is used for audio visualizer expressions. FInally there is the throat micophone. Throat mic can be attached to the protogen head with a 3.5mm audio cable which is inside the right side of the protogen heads neck. Throat microphone is immune to external noise so it can be used even in the noiciest environments.
Currently used microphoen can be selected in the settings tab. Pressing the mic option will switch between internal, throa, and mic off options. Ear microphone automatically used for audiovisualizer expressions and cannot be manually selected.
V1: Sensitivity for the internal and throat microphone can be changed through the settings tab with the sensitivity up and down options. Higher the sensitivy number is the less sensitive the microphone is to sound. On the PCB there is a blue LED which always turns on when the mouth of the protogen in open. This can be used to know if the sensitivity is too high/low.
V2: Sensitivity for the internal and throat microphone can be changed through the settings tab with the sensitivity up and down options. Higher the sensitivy number is the more sensitive the microphone is to sound. On the PCB there is a blue LED which always turns on when the mouth of the protogen in open. This can be used to know if the sensitivity is too high/low.
Fans
There are three fans in total. One fans sucks fresh air in from the bottom front of the visor. A blower fan is used to blow out air from near the users mouth. A second blower fan blows air directly at the visor to prevent fogging.
V1:
Intake fan is always on at a constant speed. Visor blower fan can be activated through settings with the "extra fan" option. Speed of the blower fans can be changed by changing the output voltage of the boost converter mounted at the back of the mouth fan. There is a golden screw on the boost controller. Turning it counter clockwise increases the blower fan speeds
V2:
All fans speeds can be individually changed through settings
V2: audio out
Speaker can be connected to the throat mic connector to play sounds. The speaker can be powered by its own power source or from the connector. There is a swicth on the PCB to select between power modes.
External power pinout
- T: Speaker
- R: Speaker
- R: GND
- S: Throat mic in
Power from the connector pinout
- T: 3V3
- R: Speaker
- R: GND
- S: Throat mic in
Some speakers may force S pin to ground so the throat mic input doesn't work at the same time with them
Changing handpaw settings
Handpaw settings can be changed using a serial terminal
V2: Disable sleep first by holding btn1 when you turn on or reset the paw controller. Blue LED indicates that the handpaw is in configuration mode
- Connect a handpaw to a computer with USB cable
- Turn on the handpaw
- Download PuTTY or other serial terminal
- Right click Windows logo and select Device Manager (Laitehallinta)
- Find category "Ports" ("Portit")
- V1: Under the "Ports" category find "STMicroelectronics Virtual COM port". Remember the port name in brackets behind the name. (Example: COM3)
- V2: Under the "Ports" category find "CP2102N USB to UART bridge controller". Remember the port name in brackets behind the name. (Example: COM3) (you may need to download a driver)
- Open PuTTY and select connection type "Serial". Write port name and open connection
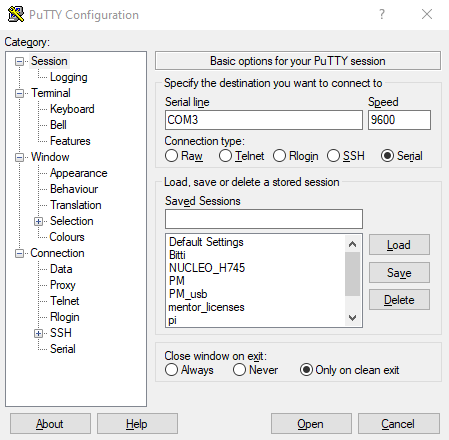
- Refresh the terminal by pressing enter

- Handpaw settings can be changed by sending commands visible in the terminal
V1(older V2 also) Setting time via handpaws
- Connect your paws to a computer and open serial connections as previous guide
- Send command Thh:mm where hh is the hours and mm is the minutes. The hours and minutes must always be made of two numbers. There is a bug and minutes or hours can't be set to 00. (Example command: T14:07 sets time to "14:07")
V1: Connectig and using Bluetooth
- Open your phones Bluetooth settings and find device "HC-05"
- Connect to the "HC-05" using password "1234"
- Download "Serial Bluetooth Terminal" app
- In the app go to "Devices" tab and select "HC-05"
- To change expressions send number 1-8
V1: Setting time via Bluetooth
- Open "Serial Bluetooth Terminal" app and connect
- Send command "Thhmm" where hh is the hour and mm is the minutes. hh and mm must alway include two numbers. (Example: "T1407" sets time to "14:07")
Settings memory and battery
V1: Current expressions and settings are stored in a battery backed memory so that when the protogen is powered on it can continue from the same state it was before being powered down. If the protogen is powered on three times with in a minute, then the protogen will revert back to default settings.
V2: Current expressions and settings are stored in a battery backed memory so that when the protogen is powered on it can continue from the same state it was before being powered down. Protogen will revert back to default settings if it reset by the reset button or watchdog timer
The settings and time are saved using a CR1220 coin cell battery at the back of the PCB. If the battery runs out or is removed then the protogen cannot remember settings/time and will always use deffault settings at startup.
Updating protogen software
- Dowload STM32CubeProgrammer software
- Change bootmode by moving a jumper or a switch from left position to right position
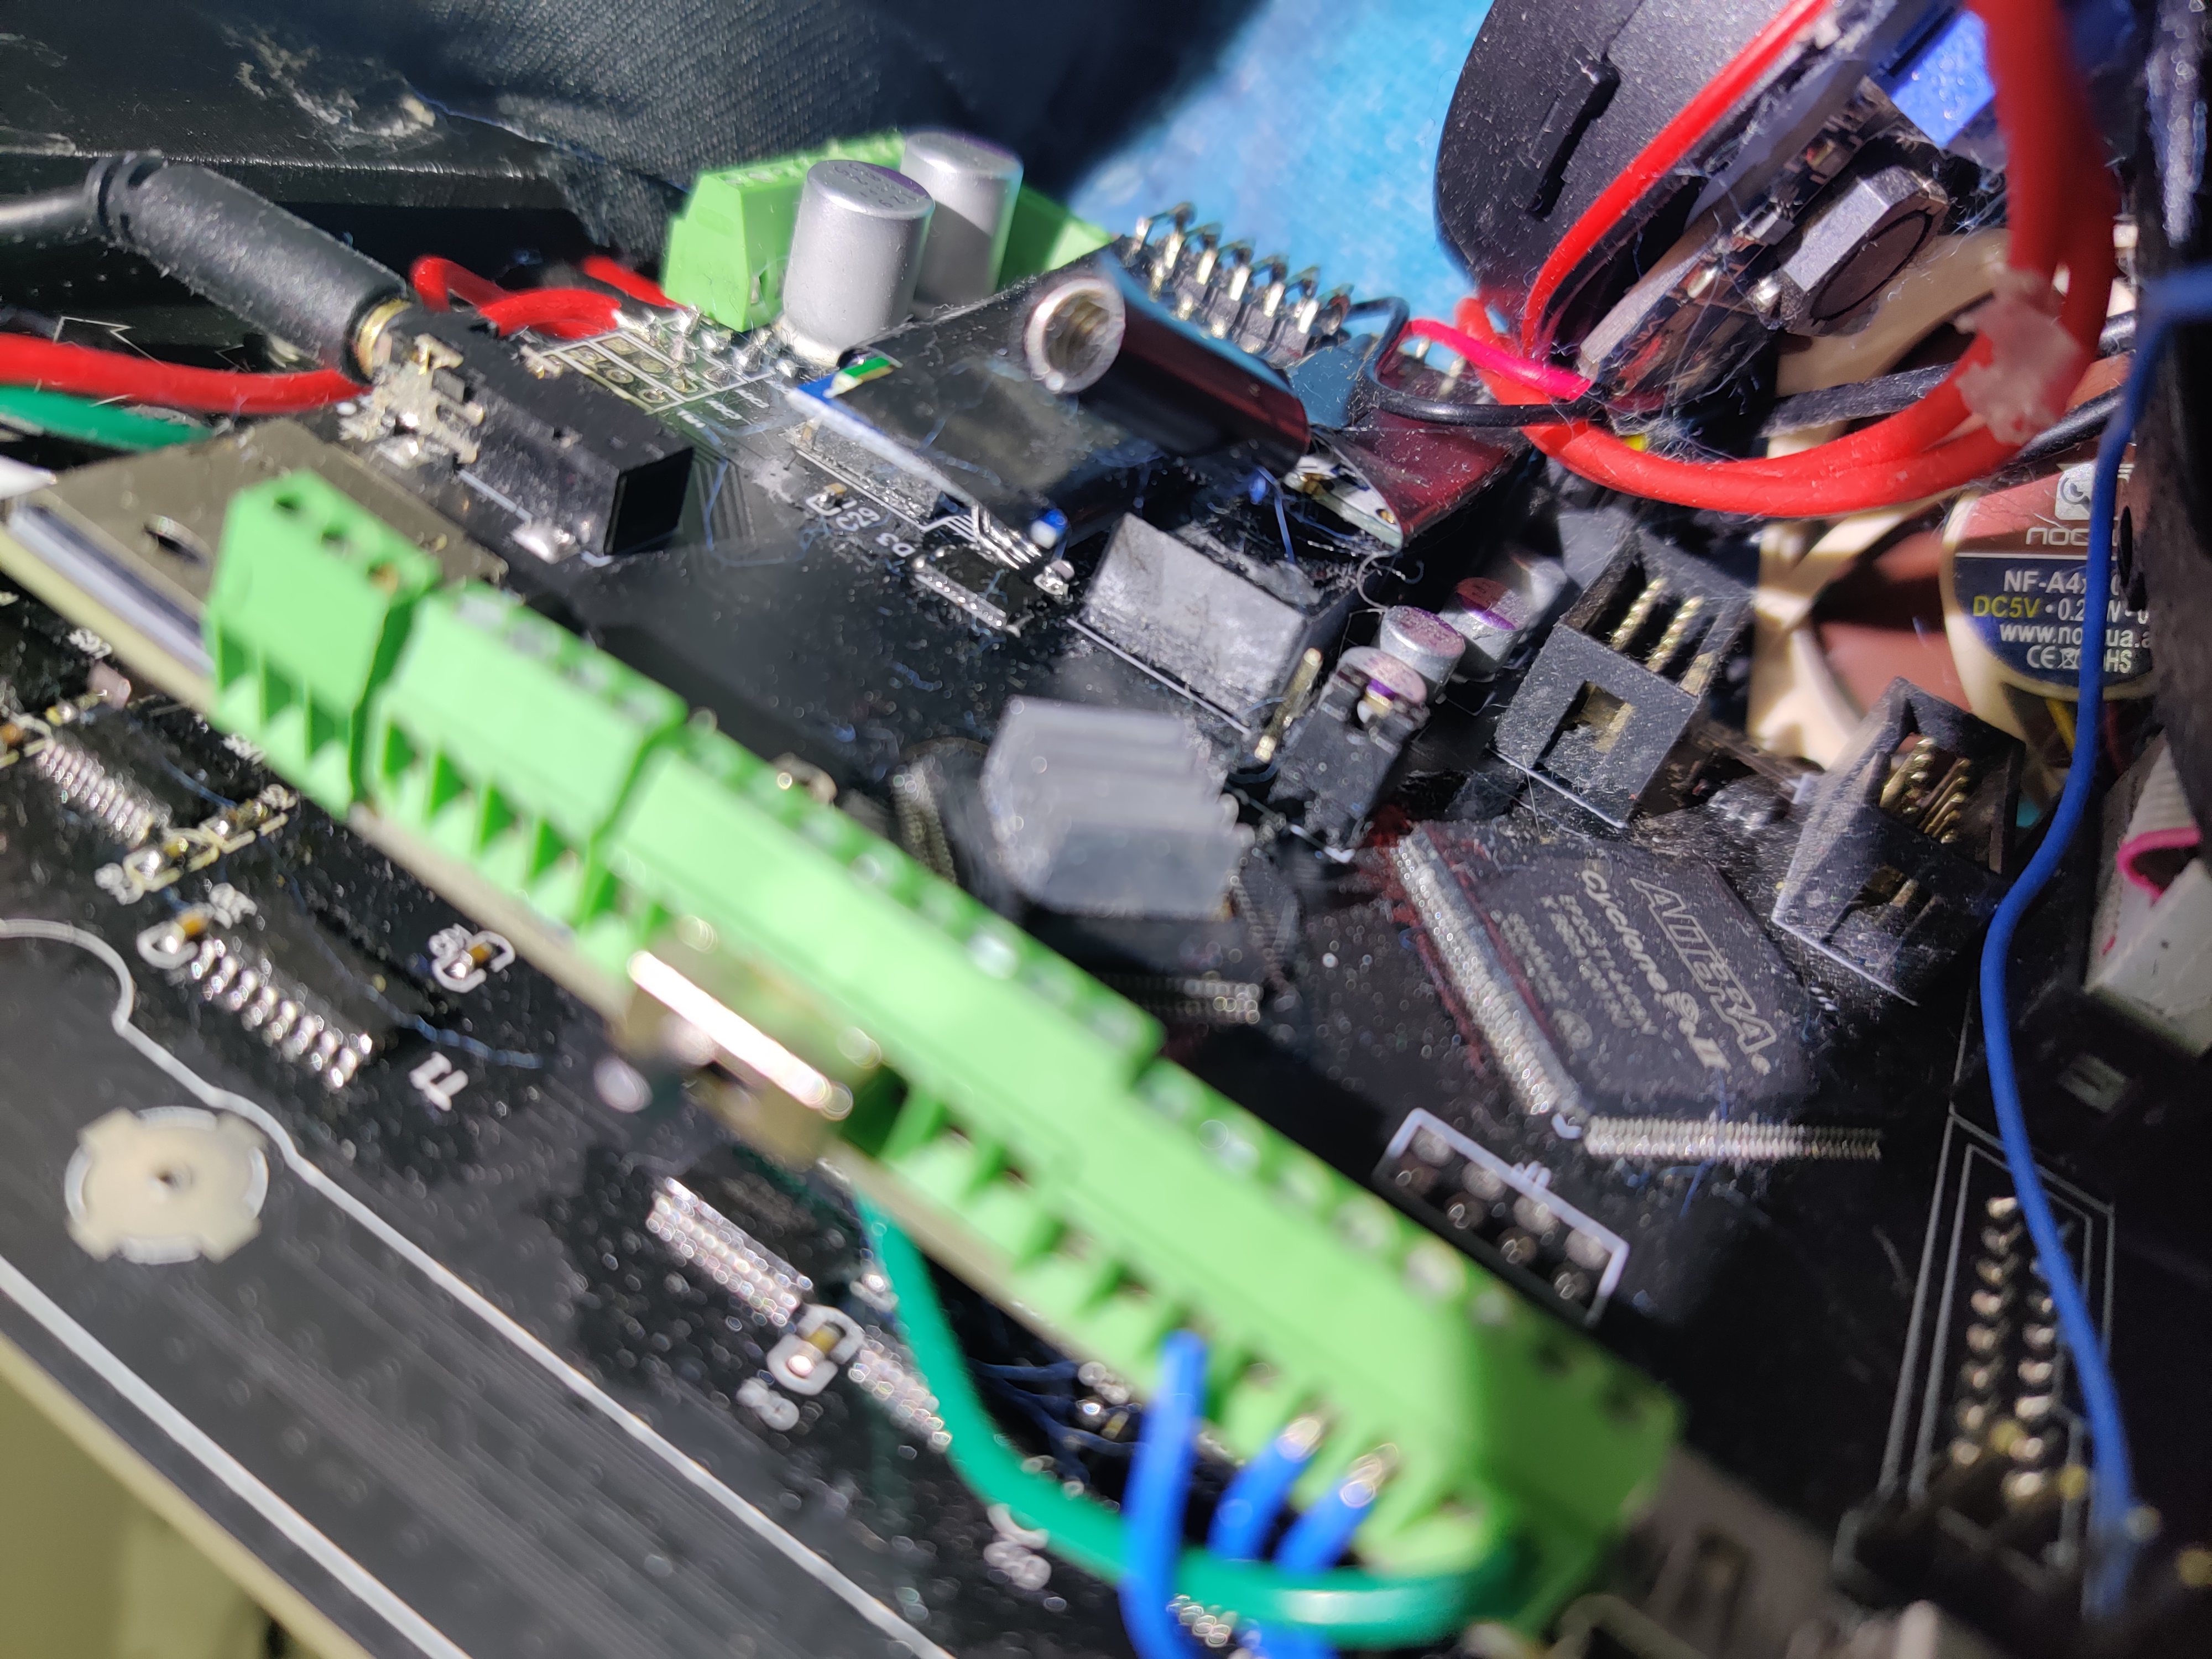
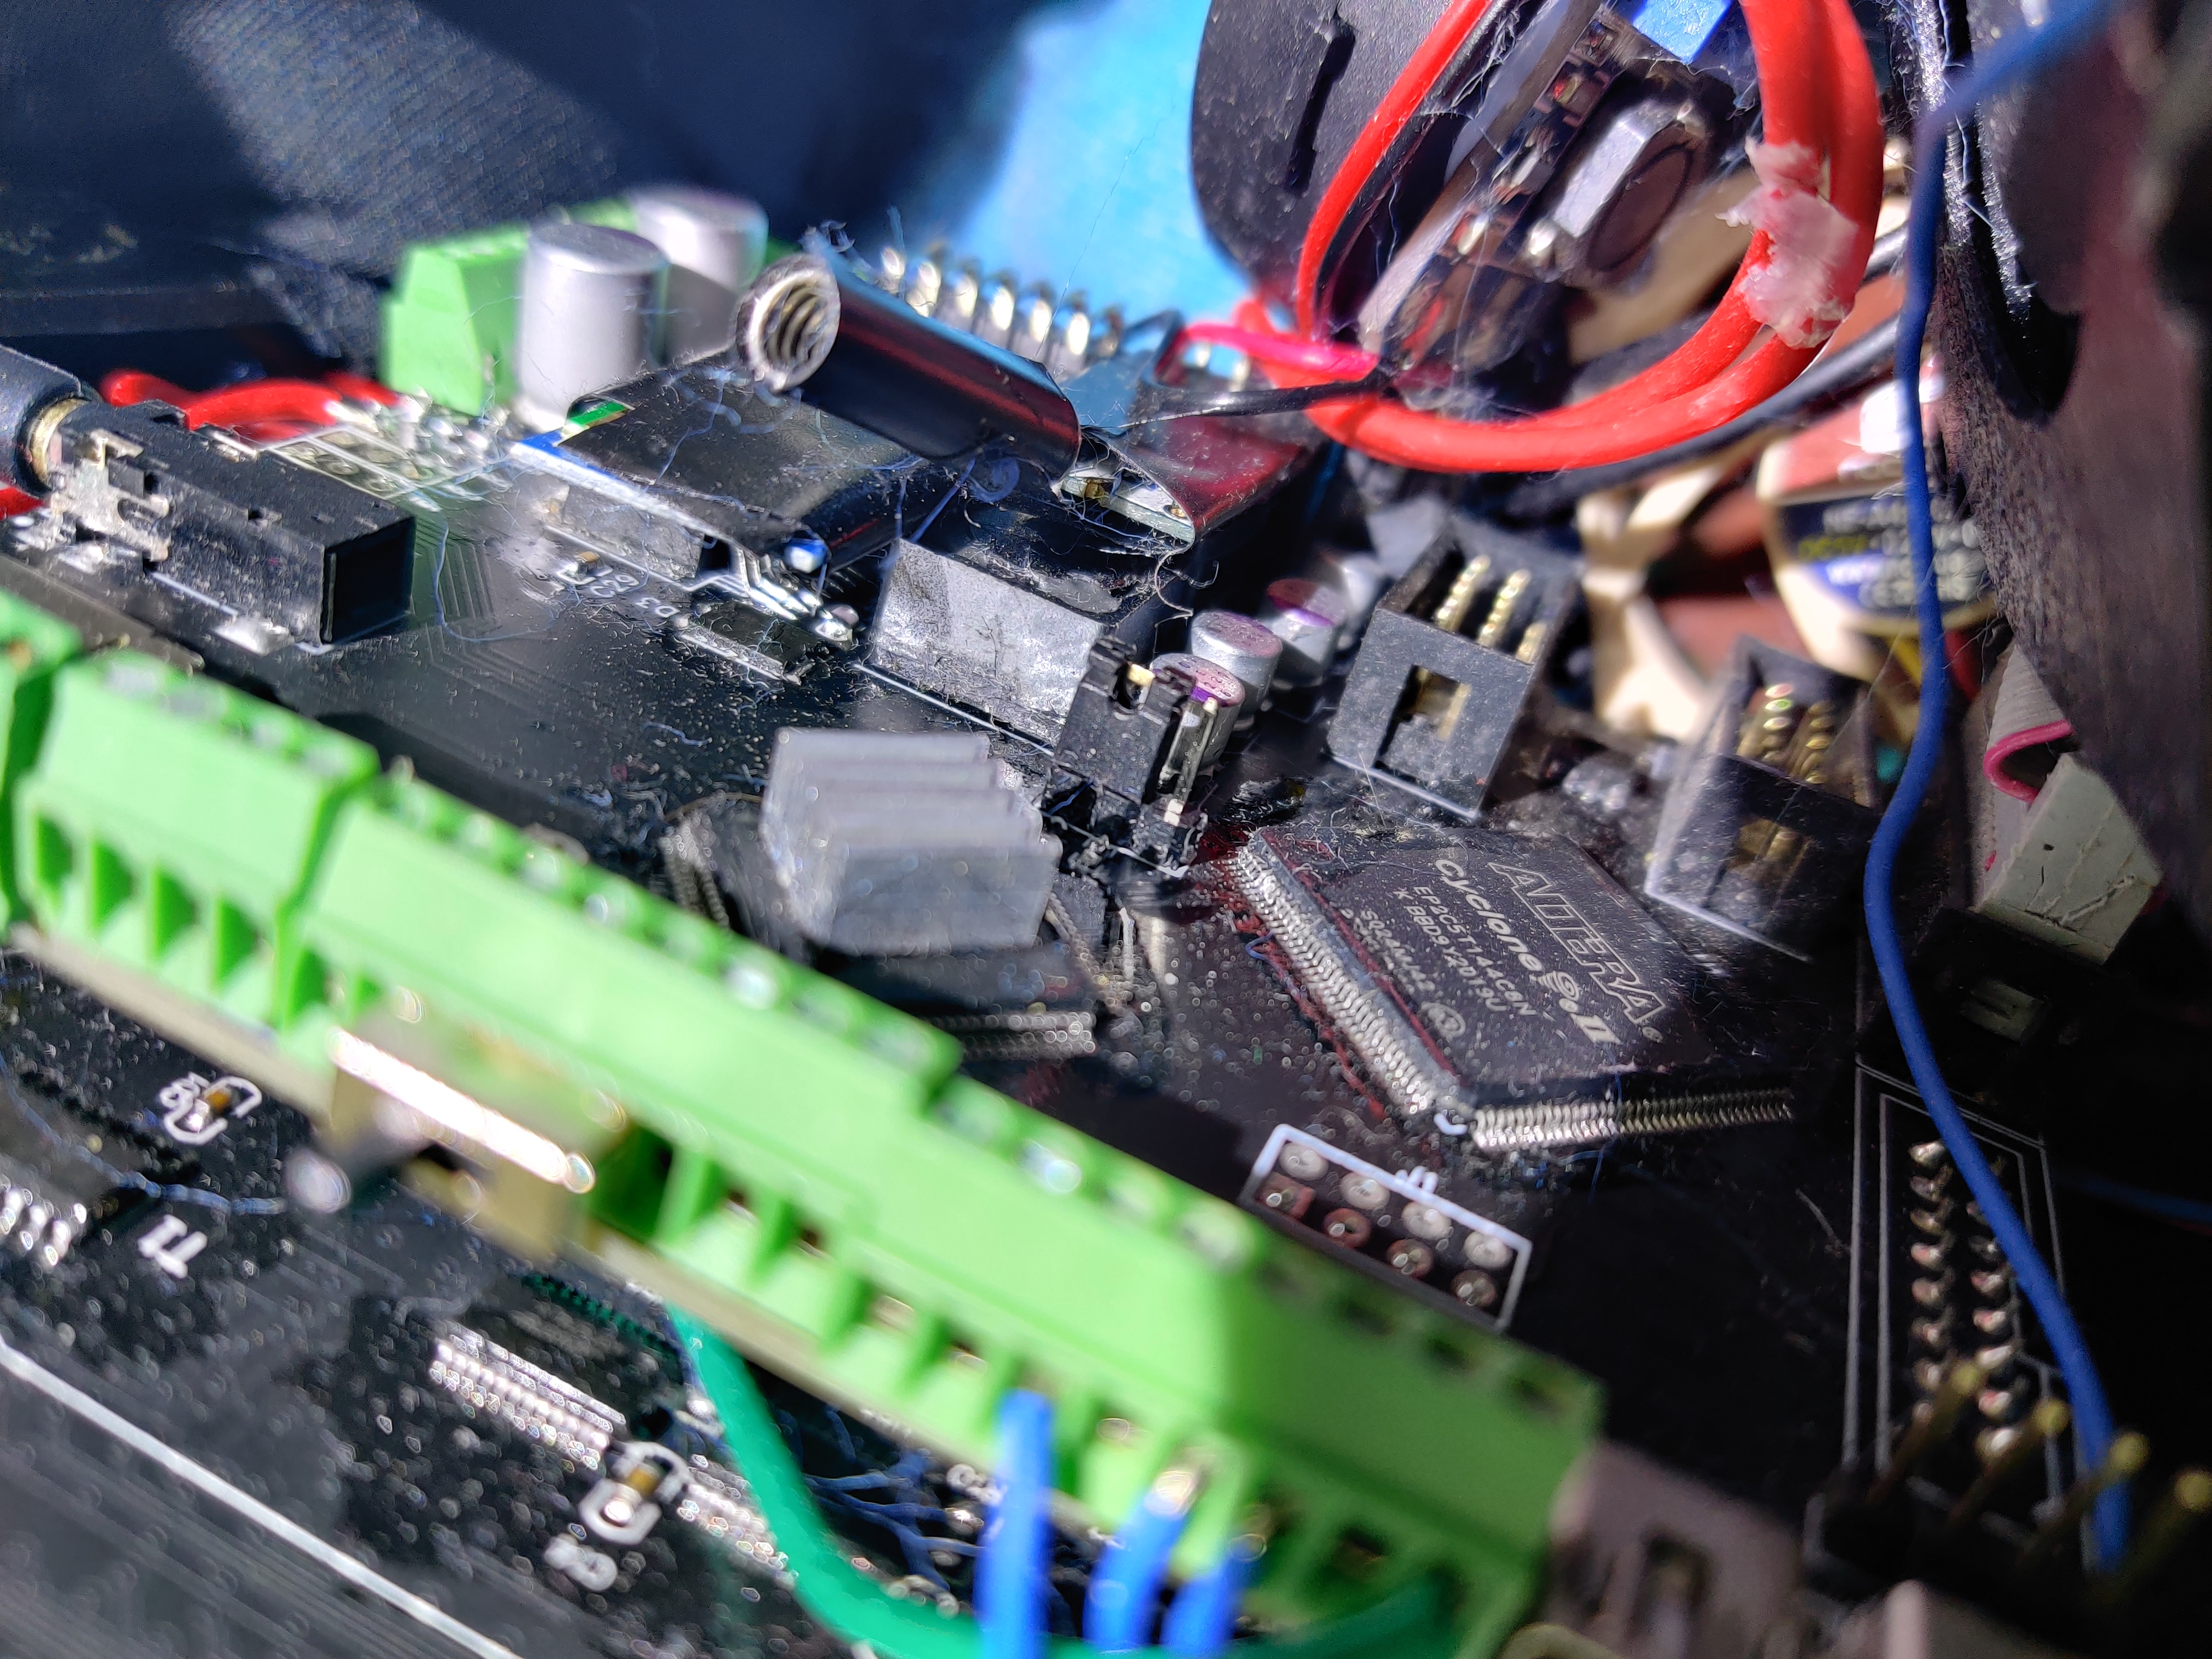
- Power toaster
- connect to computer via usb cable
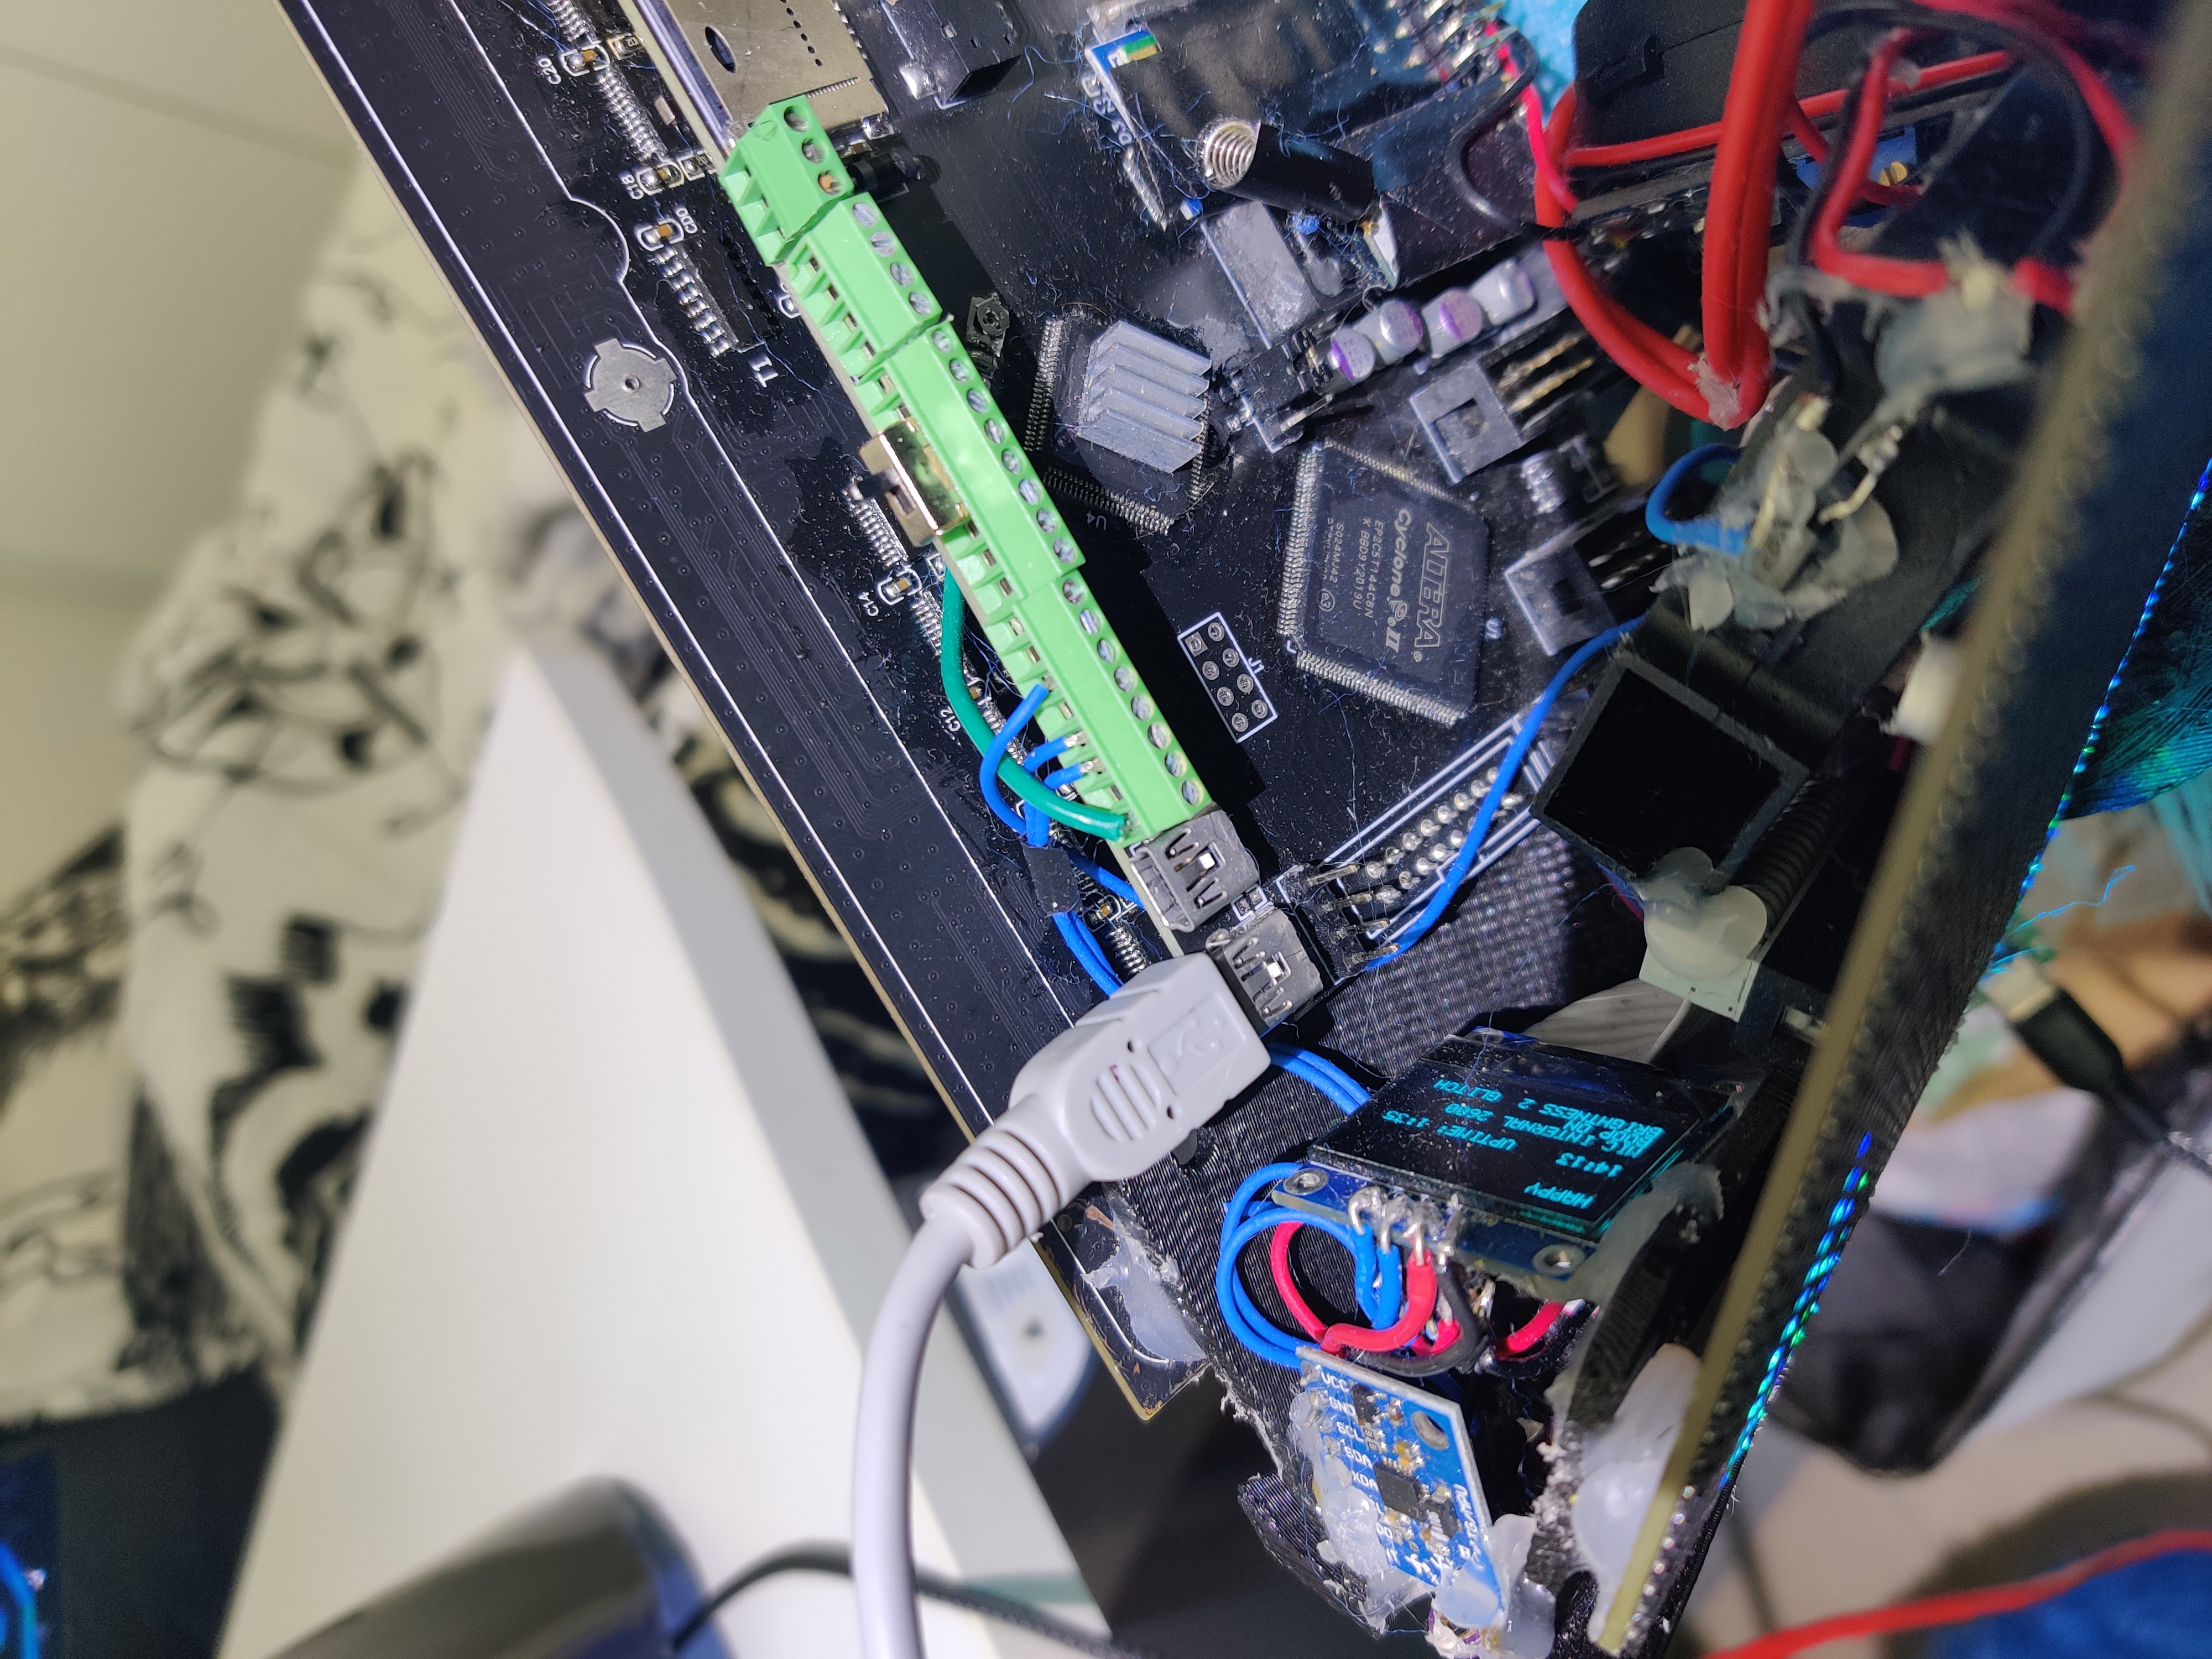
- open STM32CubeProgrammer
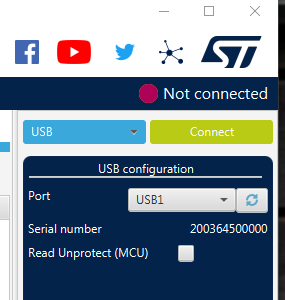
- Select USB from dropdown menu and press connect
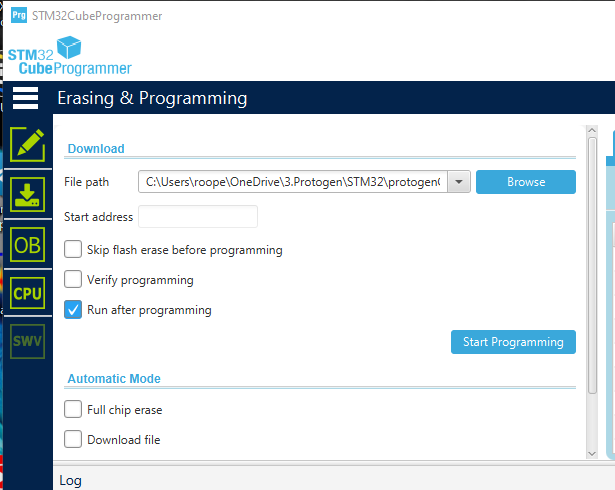
- Select Erasing & Programming tab from the left. Change file path to the .elf file you were given. Select same options as in the image. Finally press "Start Programming"
- Change bootmode jumper/switch back to left position
- Repower your toaster
Washing
The head can only be hand washed and must be unpowered. Keep the visor attached at all times and avoid getting water inside the visor. Wash with max 30C water and use laundry detergent. Rinse carefully to get all the detergent off. Let the head dry fully before powering. The electronics won't break if they get wet as long as the head is not powered.
Remove battery from handpaws before washing. The electronics are coated with lacquer. Wash the paws according to your makers instructions but do not machine wash. Let the paws fully dry before inserting the battery.